Yamaha R1 Rhino build up
- Thread starter marc177s
- Start date
Got a little more done this weekend.
Finally got around to re-enforcing the front control arm mounts.

Added my steering shaft and support. I'm using a #35 sprocket and chain setup on the steering shafts. I did this for a couple reasons. I'll be able to get rid of the u-joint angles, my lock to lock will be adjustable by changing sprocket sizes, and I can lengthen or shorten the steering wheel shaft. Everything will be behind the aluminum (or possibly Carbon Fiber. Depends if I feel like laying it out) dash.


My kid is climbing all over this thing so I decided to go ahead and add the passenger grab bar.

Also got around to adding the cross braces on the roof.

Installed a couple gussett's.

I was going to use 3/4" Heim joints for all the control arm mounts. But then I decided against it. Now I'm using 1 1/4" Delrin bushings with 7/16" ID S.S sleeves. This is the 1st one I fab'd up today.

I would like to get the steering rack mounted tomorrow and hopefully be done with the frame this week.
I'm waiting till the last minute to add the driver's side cross bars so their not in the way when I do my tin work.
Finally got around to re-enforcing the front control arm mounts.
Added my steering shaft and support. I'm using a #35 sprocket and chain setup on the steering shafts. I did this for a couple reasons. I'll be able to get rid of the u-joint angles, my lock to lock will be adjustable by changing sprocket sizes, and I can lengthen or shorten the steering wheel shaft. Everything will be behind the aluminum (or possibly Carbon Fiber. Depends if I feel like laying it out) dash.
My kid is climbing all over this thing so I decided to go ahead and add the passenger grab bar.
Also got around to adding the cross braces on the roof.
Installed a couple gussett's.
I was going to use 3/4" Heim joints for all the control arm mounts. But then I decided against it. Now I'm using 1 1/4" Delrin bushings with 7/16" ID S.S sleeves. This is the 1st one I fab'd up today.
I would like to get the steering rack mounted tomorrow and hopefully be done with the frame this week.
I'm waiting till the last minute to add the driver's side cross bars so their not in the way when I do my tin work.
Looking very good. May I suggest a few things during your build?
Tack weld your bars in place until your pretty much done with all the added tubing to the cage. Then fully weld them in. Chances are you'r going to change things up during the build due to suspension fitting, body fitting, ???? this will make it much easier and faster to do the changes.
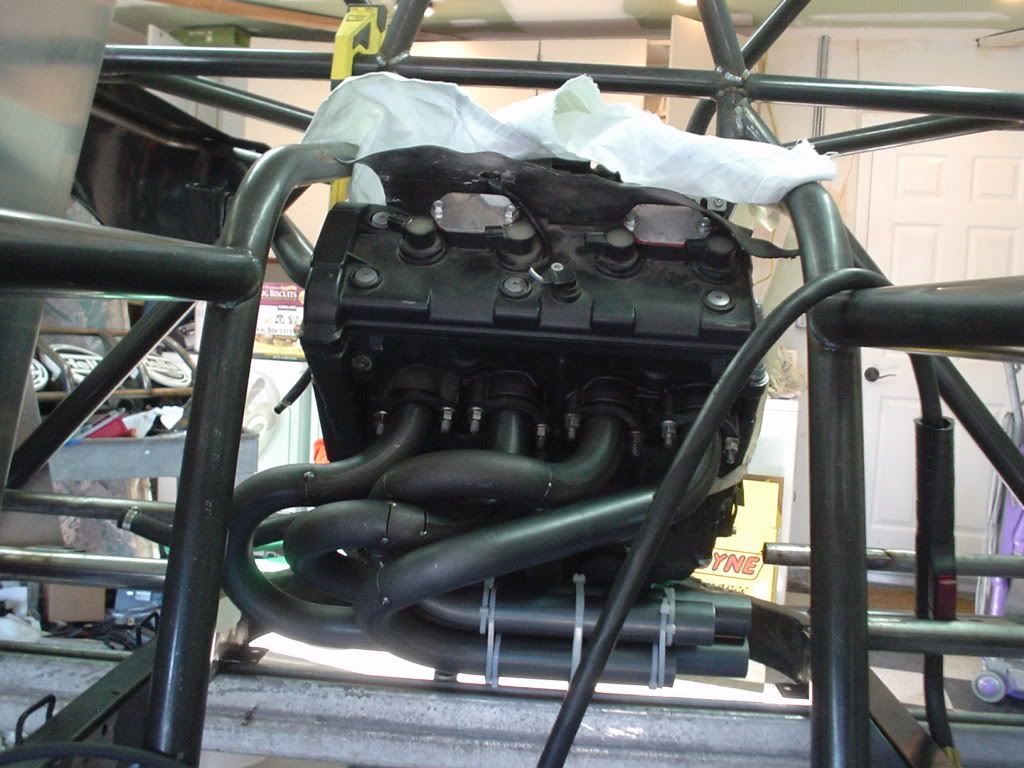
Also, (No offense Big Jim) If I were you I would build the header myself. Looks like you got all the tools (tig) and talent to do it. This will save you $$$$. I think I got about $150.00 into my header and just over a day of labor including all the muffler mounting.
Don't cheap out and use rod ends on your front A-Arms. Spend the extra money and use Uniballs to connect your spindles. MUCH, MUCH stronger.
If you don't have rear fenders yet, I'm selling a set "Brand New"
Painted Rhino Fenders & Lower side panels. Brand new - Yamaha Rhino Forum - Rhino Forums.net
keep up the hard work, It's looking great !
Tack weld your bars in place until your pretty much done with all the added tubing to the cage. Then fully weld them in. Chances are you'r going to change things up during the build due to suspension fitting, body fitting, ???? this will make it much easier and faster to do the changes.
Also, (No offense Big Jim) If I were you I would build the header myself. Looks like you got all the tools (tig) and talent to do it. This will save you $$$$. I think I got about $150.00 into my header and just over a day of labor including all the muffler mounting.
Don't cheap out and use rod ends on your front A-Arms. Spend the extra money and use Uniballs to connect your spindles. MUCH, MUCH stronger.
If you don't have rear fenders yet, I'm selling a set "Brand New"
Painted Rhino Fenders & Lower side panels. Brand new - Yamaha Rhino Forum - Rhino Forums.net
keep up the hard work, It's looking great !
Looking very good. May I suggest a few things during your build?
Tack weld your bars in place until your pretty much done with all the added tubing to the cage. Then fully weld them in. Chances are you'r going to change things up during the build due to suspension fitting, body fitting, ???? this will make it much easier and faster to do the changes.
Also, (No offense Big Jim) If I were you I would build the header myself. Looks like you got all the tools (tig) and talent to do it. This will save you $$$$. I think I got about $150.00 into my header and just over a day of labor including all the muffler mounting.
Don't cheap out and use rod ends on your front A-Arms. Spend the extra money and use Uniballs to connect your spindles. MUCH, MUCH stronger.
If you don't have rear fenders yet, I'm selling a set "Brand New"
Painted Rhino Fenders & Lower side panels. Brand new - Yamaha Rhino Forum - Rhino Forums.net
keep up the hard work, It's looking great !
None taken Brotha!!! a header is a piece that alot of folks arent interested in tackling.....Your right....parts are cheap....labor isnt. The guy that put ours together has 20 hours in it.
since your wanting a LOORRS legal car, you need to take a look at thier rule book online. You need to have an x brace over the driver's head, (or super think bolt on aluminum sheet, if I remember correctly) an A or x brace in the drivers door area, and certain sized gussets at all the main tube joints etc... Now would be the time to make sure your addressing those rules. Keep up the good work!
G-
G-
Thanks for the input guys.
Stetler, your right it's defenitly easier to make changes while tacked. For the most part that's what I did for the main cage. But your right I should have done that till the car was mostly finished. Luckily I haven't had to make too many changes even with the body panels mocked up.
I'll be using .120 Aluminum sheet for the roof, but If I need to add cross braces above the driver, no big deal. Easy enough to add stuff. The side door braces should be fine for any organization. I know they are for VORRA so hopefully they are for LOORRS also.
Your right about the gussett's. I guess I need to change a couple gussett's. They need to be 3".
The rules don't say much about the door braces:
All roll-cages must be designed and constructed with one front vertical hoop, one rear vertical hoop, two interconnecting top bars, two rear down braces, two wing’ wang bars (“B” pillar) constructed of 1.0” 0.95 chromoly or 1.0” 1.20 DOM, one diagonal brace and all necessary gussets. The two top interconnecting bars must be placed as far to the outside of the top section of the front and rear hoops as possible. Rear down braces and diagonal brace must angle a minimum of 30 degrees from vertical. At the bottom of the diagonal brace there must be a cross member of the same tubing material and dimensions as the hoop. All roll-cage components (hoops, braces, gussets, etc.) must have a minimum of 3-inch clearance from the component to the vehicle occupant’s helmets when occupants are seated in their normal riding positions.
All portions of the roll bar or bracing that might come into contact with the vehicle occupant’s helmets must be padded.
Roll-cages must be securely attached to the frame or body. All intersecting points must be gusseted and braced. Gussets must be installed at all major intersections, including diagonal and rear down braces, where single weld fractures can affect occupants’ safety.
These as the VORRA rules that I'm actually going off of:
UR42: DOORS & LATCHES
All vehicles must have a minimum of a single door bar bracing in door area of the same tubing size and material of the roll cage. Ladder design must be at least 1.25” diameter x .090” wall thickness for rungs. Doors that latch or open and close are only allowed provided they have secondary locking pins. Full door window nets are required. Wrist restraints may be substituted for window nets during short course events only, although not recommended.
Again, thanks for your input. This is defenitly the time to know what changes I need to make.
LOORS Doors
A. Door area must be covered with sheet metal or a minimum of .063 inch thick aluminum.
B. Doors must have 'X', 'A', or Ladder design bracing designed to provide maximum protection to the driver.
1. X or A designs must use a minimum 1 1⁄2 inch diameter by .095, 4130 chromoly or DOM.
2. Ladder design must use a minimum 1 1⁄2 inch diameter by .095 for main rails and 1 1⁄4 inch by .095 for rungs.
LOORS Roof
Top left half of roll cage above driver‟s head must have 1 1⁄2 inch x .095 inch „X‟ diagonal bracing bars and/or be covered with .125 inch minimum aluminum plate.
a. If plate is used, a single diagonal bar is sufficient.
b. Plate must be attached with 2 bolts on each of the four sides.
Entire roof must be covered with sheet metal or .063 inch minimum aluminum.
Here's a few more photo's of this weeks work.
Mounted my clutch and brake pedal assembly.


Mounted the steering shaft and rack assembly using a Delrin guide. I'll install a Delrin roller on the chain as soon as it comes in. With this rack and setup and using (2) 18t sprockets, It is (1) full turn from lock to lock, so from center it's a 1/2 turn to lock. If I don't like that then later on I'll install a 20t sprocket on the rack side. At some point I'm going to install another u-joint and bearing and make my steering wheel height adjustable.

Fab'd up one of the front spindles. Second photo is with the brake rotor sitting in place.


Mounted sliders on the drivers seat. That made thing's so much easier for setup.

Mounted my clutch and brake pedal assembly.
Mounted the steering shaft and rack assembly using a Delrin guide. I'll install a Delrin roller on the chain as soon as it comes in. With this rack and setup and using (2) 18t sprockets, It is (1) full turn from lock to lock, so from center it's a 1/2 turn to lock. If I don't like that then later on I'll install a 20t sprocket on the rack side. At some point I'm going to install another u-joint and bearing and make my steering wheel height adjustable.
Fab'd up one of the front spindles. Second photo is with the brake rotor sitting in place.
Mounted sliders on the drivers seat. That made thing's so much easier for setup.
Nope, I've never ran it before. This is total experiment. I got the idea from a Rhino that was built for SCORE. Since I'm building this from scratch with no original parts I figured this should be the best way to get around the drastic angles from using a universal steering rack. We'll see how it works.I am very interested in that chain-drive steering setup. Have you ever ran one before?
Yeah, I was debating doing that with mine because of the same angle issues. I just wasnt sure if the feel would be sloppy, or if there would be binding issues. I'm interested to see how it runsNope, I've never ran it before. This is total experiment. I got the idea from a Rhino that was built for SCORE. Since I'm building this from scratch with no original parts I figured this should be the best way to get around the drastic angles from using a universal steering rack. We'll see how it works.
Does anyone know the total or corner weights of their R1 Rhino? I know they all vary from car to car but I would just like a ball park figure to estimate the spring rates I will be using.
I'm getting to where I need to order my shocks and they need to know each corner weight. I'm using 1.5" x .120 wall DOM on the cage and 1.5" x .095 on all support bracing. Fuel cell and battery mounted in front. I would like to order the shocks and if I need to send them back for a re-valve no big deal. But I would like to atleast get them as close as possible. Thanks for any info!
I'm getting to where I need to order my shocks and they need to know each corner weight. I'm using 1.5" x .120 wall DOM on the cage and 1.5" x .095 on all support bracing. Fuel cell and battery mounted in front. I would like to order the shocks and if I need to send them back for a re-valve no big deal. But I would like to atleast get them as close as possible. Thanks for any info!
Dont know where yours will come in, but I can tell you LOORRS mininum weight is 1400 lbs with driver. My fairly heavy desert car came in at 1650 with me in it (190lbs) and half full 12 Gal fuel cell (no spares/tools).
Since you used 120 wall, I would plan on around 1500-1600 easy.
Since you used 120 wall, I would plan on around 1500-1600 easy.
Got a little more done yesterday. Built the front A-arms (one side). I still need to box them. I may go to Uni-balls later, but not right now. I'm already over budget.
With this setup I'm getting 17 1/2" of travel before the Heim's binde up. I measured this with 1 deg. of positive camber and caster, and 1/8" of toe out.


I think I used too short of a steering rack though. I'm using a heavy duty, off-road rack but I'm having a hard time getting the geometry of the tie rods to match the a-arms. I'm real close, but I start to loose toe in the last 4" of travel. The camber is good and stays nice and straight throughout the travel.
I guess I'll see how it handles and how much bump steer I get. Easy enough to make steering changes later.
With this setup I'm getting 17 1/2" of travel before the Heim's binde up. I measured this with 1 deg. of positive camber and caster, and 1/8" of toe out.
I think I used too short of a steering rack though. I'm using a heavy duty, off-road rack but I'm having a hard time getting the geometry of the tie rods to match the a-arms. I'm real close, but I start to loose toe in the last 4" of travel. The camber is good and stays nice and straight throughout the travel.
I guess I'll see how it handles and how much bump steer I get. Easy enough to make steering changes later.