Cost of Winning: The Monster Mav Chronicles

badassmav

Well-Known Member
Jun 11, 2013
1,379
182
63
60
Jamul
Wheelbase is moving back 6" but stock width. The axles won't be exactly in line but they'll be close. I may be able to move the radius rod frame mounting points which the rules allow.
Good heads up on the brakes though. I haven't thought that far yet but that's something that I'll need to address. Tight deadline for this build but I'll see what happens.
I'm going to play with the radius rod mounts and see what I can do. I don't want to high jack your thread but maybe some of this will help us.
No hijacking going on. As long as we share with the masses design boundaries for the type of suspension we are running, it's all good!

So, moving back the axle centerline only 6"? Are you notching or rebuilding the rear most a arm pivot bracket (the one that the radius rods mount to)? My ragged memory tells me that 8" was needed to clear the bracket w/the cv.
 

badassmav

Well-Known Member
Jun 11, 2013
1,379
182
63
60
Jamul
Reid, I just completed the covert mission that I've been working in with your help. It was a complete success!!!! Thanks for all your help. I couldn't have tackled it without you. You my friend are a dying breed in this world. Hopefully someday I can help pass along the knowledge that I've gained and educate people as you do


Sent from my iPhone using Tapatalk
Now, your sand toy is one step closer to being badass!!
 

warlock

Wanna Go Fast? - UTVUnderground Approved
Jan 23, 2009
1,041
170
63
54
az
The design of the rear suspension was modified by can am engineers from a design a friend of mine utilized for some sand cars he built and he is a Canam dealer. They studied his suspension and made it a little more consumer friendly. He has what's considered a modified 5 link if I do remember correctly. It's also considered Rear steer. By the way it changes the direction of the rear tires when leaning into corners. I think a lot of the European Rally cars utilize this technology. It is a little different to get used to driving but it corners fast and helps shave lap times down. I'm doing this from my cell phone so maybe I can tell ya more about what it was later. Jay did say that it would not be hard to make the factory Canam rear do the whole rear steer like his cars. Might be something for you to one day look into.:D
 

AReed

Member
Oct 2, 2012
234
2
18
We're 6 inches back in the wheelbase and about 10" back with the diff. I'll know exactly where I stand once I get the diff back in tomorrow.
 

badassmav

Well-Known Member
Jun 11, 2013
1,379
182
63
60
Jamul
It's nice that you designed the carrier box to facilitate removing the diff out the rear like the factory application. Mine removes by dis connecting the drive shaft (that pain in the ass bolt that screws into the pinion via the drive shaft yolk), and removing the diff out the top. Not too user or maintenance friendly. That's for sure! So, it looks like you use the stock 3 point mounting locations to bolt the carrier box onto the frame. Does the diff just hang out behind with no further support, or do you pick up the rear end of the carrier box with an additional strut?
 

AReed

Member
Oct 2, 2012
234
2
18
On mine the cage and bumper will tie in for the support along with some additional gussets. I'm not sure what exactly I'm going to do until I get it in and finished from a production standpoint.
 

AReed

Member
Oct 2, 2012
234
2
18
F UTV makes the best skids hands down.

You said you had a couple bent arms. What exactly bent?
 

badassmav

Well-Known Member
Jun 11, 2013
1,379
182
63
60
Jamul
F UTV makes the best skids hands down.

You said you had a couple bent arms. What exactly bent?
The bottom plate of both lower rear arms, and the bottom plate of one of the front lower arms buckled from impacting rocks, or other hard obstacles. The rear arms have a couple thousand hard miles on them, so it's time to replace them anyway.

The front one I just recently re-designed and built them. The first race was the IV 250. I need to confirm that indeed it was an impact that buckled it. I added a cutout in the center of the arm, and changed the interior bracing as well so I need to be certain that it is not a strength issue that contributed to the buckling. I'll add better pics when I get them off of the car.
 

Attachments

badassmav

Well-Known Member
Jun 11, 2013
1,379
182
63
60
Jamul
Reid, I just completed the covert mission that I've been working in with your help. It was a complete success!!!! Thanks for all your help. I couldn't have tackled it without you. You my friend are a dying breed in this world. Hopefully someday I can help pass along the knowledge that I've gained and educate people as you do


Sent from my iPhone using Tapatalk
For those of you who dont know, Jim (mearsman) was inspired by the pics I posted of our front suspension/steering mods. So inspired, that he dove in and began to modify the steering on his maverick from a rear to a front steer as well.

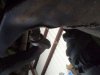
The mod is quite extensive, and uses the driver side spindle on the passenger side and vice versa. He had some challenges in getting the bump steer minimized, and I talked him through it until he achieved satisfactory results. He also realized, like Areed did, that he would need to address the "backwards/upside down" brake caliper dilemma that switching sides with the spindle creates. (I explained this in detail to Alex on the 1st or 2nd page of this thread).

Because it took some time to find an adequate replacement brake caliper, and more experience than most weekend builders have to design a caliper adapter bracket, I gave him a part number for the required brake caliper (I went with OEM Can-am. The caliper is a 2 piston design off of the 1000 cc Outlander). Well, I felt kind of bad that my postings got him in a bit deep, so to save him time and money, I also gave him the digital .DXF file that I generated while designing the brakes for the Monster Mav so he could have the adapter brackets cnc cut out at his local fab/machine shop. Jim was greatful, and sent me 37 lbs. of pennies:D! Just joking. He was gracious enough though to drop ship me a new power supply for my laptop computer upon my request. Thanks a lot buddy!

I have yet to see the finished product, so Jim, if youi don't mind sharing, could you post a couple of pics for us all to see? Was it worth the effort? If you don't mind my asking, how much money did the project end up costing you, including the price of my power supply. My guess is 700-800 dollars if you used new parts.

Quite a few poeple, including Marc, have asked me why I'm giving away things that I worked so hard for, and could be selling instead. To me, this stuff is fab 101. It's nothing special or new. It has all been done before, and I really don't need much money anyhow. I'll just pay it forward now because it does me no good once I've left. Besides, the world is already full of takers, and it could use a few more people who are willing to give. Save your hard earned cash and time for your family unit. If I have time and motivation in the future, then I can market a kit and earn some money. Right now, I'm just trying to help people through sharing, so pay it forward, will ya'!:)
 
  • Like
Reactions: 1 person

badassmav

Well-Known Member
Jun 11, 2013
1,379
182
63
60
Jamul
Donaldson Radial Seal?
Air Filtration:
Are you referring to the air filter? Man, what a difference the Donaldson canister style air filters make over the factory "wafer" type. All last year, we ran the stock airbox (don't ask me why) with an oiled UNI foam filter. IMO, the oiled foam design is old news. It works well, but clogs when subjected to harsh environments. Let's say, oh, LIKE A SILT BED!! There is not enough surface area either, and the air box is a pain to keep sealed.

I exchanged the stock air box before the SF250 with a canister filter from Cliff at UMP in North County, and haven't looked back since. It is the 6" dia. x 12" lg. model. I had Cliff weld on a 2 1/2 " outlet tube on the end instead of the standard 3" so it matched up to my stock rubber intake tube. Like the coil overs, I wanted to keep it under the hood panel as to maintain the stock appearance. So I tucked it down deep. Now, I have to remove the strap, and slip it up and off of the throttle body to change change out the filter. Not so service friendly! I will modify it before the V2R so it can be changed during a race more efficiently.

A note about the replacement filters:

I bought my replacement element at ORW. They sell the "Baldwin" brand elements, instead of the "Donaldson" brand. Upon returning to the shop, I was pleasantly surprised to see that the Baldwin element had a different gasket at the end of the filter than the Donaldson did, and came with a more positive sealing front washer as well. The Donaldson has a "compression" style gasket made from buna rubber, while the Baldwin filter has a "contact" style gasket made from solid closed cell neoprene rubber. Upon removal of the filter(s), I noticed that the Donaldson gasket had cracks, and remained somewhat flattened, whilst the Baldwin gasket sprung back to its original shape with no damage at all!
(maybe I over tightened it. There is a small amount of warpage on the end cap as a result of welding, so I wanted to be certain that the interface properly sealed. I also lightly greased the buna rubber with silicone grease, whereas I installed the neoprene gasket dry)
Winner, ORW and the Baldwin element!
 

Attachments

Last edited:

badassmav

Well-Known Member
Jun 11, 2013
1,379
182
63
60
Jamul
Badassmav, I'm just curious, sponsored by general tire but running blackwaters? How they holding up for you?
This subject has been the center of a malicious effort after last years Baja1000, and the Henderson 250 as well, to expose us as "disloyal " to General. I could sense by the verbage in your question, that that is not your goal. Thanks for that:)!

To clarify the discrepancy, General Tires is a title sponsor for Marc's Freestylemx.com Worldwide Tour, not the off-road campaign. Every vehicle we drive, including the chase and support vehicles for our desert racing campaign are outfitted with Generals. The logo on the skid plate of The Monster Mav is complimentary, as is running their brand. Although we ran the Grabber AT2's in the beginning, we switched brands before the 1000 for durability reasons. While the AT2 is a great light truck tire, it only is available with a 2 ply side wall, and is vulnerable to punctures in the harsh environment of desert racing.

To answer your question, they hold up awesome. With their 8 ply sidewalls, we can run them at 20 psi., where we had to run 30 in the Generals. We had over 1,200 race miles on the first set that we ran since the 1000, and had only 3 flat tires in 4 races. We finally installed new ones for the Baja 500, and ran all day without a flat, puncture, slow leak, deep gash....... well you get the idea!

Based on a meeting that Marc had with Continental at last years SEMA show, Generel Tire (Continental) is working on a specific UTV tire to fit our needs, and should be available soon. A positive sign of the growth of Utility Terrain Vehicles.
 

madviking

Member
Mar 15, 2014
71
3
8
Are you referring to the air filter?
Yes, thanks. I utilize some of their products on various builds around here. Donaldson produces many great products, and I'm glad to see folks using these real filters that actually do what they are intended to - effectively filter air. I have a good filter test link, if you are interested (?), a real eye opener. Also, if you want to kick it up a notch, check out the PSD series intakes they build.
 

badassmav

Well-Known Member
Jun 11, 2013
1,379
182
63
60
Jamul
Yes, thanks. I utilize some of their products on various builds around here. Donaldson produces many great products, and I'm glad to see folks using these real filters that actually do what they are intended to - effectively filter air. I have a good filter test link, if you are interested (?), a real eye opener. Also, if you want to kick it up a notch, check out the PSD series intakes they build.
Link me, I'm interested!
 

mearsman

Active Member
Nov 2, 2011
459
55
28
52
There's not a lot of people in this world left who will pay it forward. We're all so insecure about what we have or don't have, that we're afraid to share the things that we have learned.

The gear on rack was $650, the calipers from the can am dealer were $300 and the 6061 that I made the tie rods out of were about 12$


Sent from my iPhone using Tapatalk
 

Members online

Forum statistics

Threads
17,292
Messages
179,387
Members
12,145
Latest member
felipebenjamin000